OAs always, I like to start us off with a terrible pun.
Before we get to the plinths, here's a quick update on what's happening on the site as of this morning.
 Here's what the site looked like this morning. The piles of earth are for filling in the foundation and plinth. On the right you can see the sump work.

Two of the three remaining sumps have been plastered and water proofed.
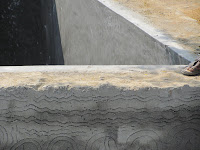
On the left you can see the texture difference between the water proofed sump (back) and the unfinished sump (front). They cover the stones up with cement and draw all these psychedelic patterns on it. The purpose of the squigglies and whatnots is to allow the last layer of waterproofed cement to take hold. If it's too smooth, the last layer of cement would just fall off in sheets.
 Here they are mixing the cement for the last layer. This is not just any cement, they need to add a water proofing compound to it to seal all the gaps. Cement and concrete by themselves are quite porous. Water damage tends to get worse with time because the water that leaks in makes the cracks bigger and allows more to leak in. Hence the water proofing compound.
 They've also started building the retaining wall on the western side. They're using some of the rock that we had to drill out of the ground. Since they are oddly shaped, it's a bit of a jigsaw puzzle to get them to fit together.
 I love the look and texture of it.
The construction workers have also adopted a couple of stray dogs on the site. Here you go, cute pictures.


Now, on to the main purpose of this post:
Enter the Plinth!
As I said in the last post, the plinth is the bit above ground level that connects the foundation to the walls and columns above it. It also defines where your floor ends.


 Then you get wood. (Insert adolescent joke here). Incidentally, the team that is working on the plint is different from the foundation team. It obviously requires a different skill set.
 Wherever there is a foundation, the plinth follows it. It's just a matter of building a mould with the planks and putting the metal ribs inside.
 And pouring in the concrete. As you can see from this picture, wherever there are two walls meeting, the ribs are worked together and the concrete poured at one shot. So it works out to be one giant piece of reinforced concrete without any joints.
 Here's the utility sump. They covered it up with wood and metal held up by some temporary scaffolding. They then created a reinforced concrete slab above it.
 Which looks like this. The water is there to allow the slab to cure without cracking.


Before we get to the plinths, here's a quick update on what's happening on the site as of this morning.


Two of the three remaining sumps have been plastered and water proofed.

On the left you can see the texture difference between the water proofed sump (back) and the unfinished sump (front). They cover the stones up with cement and draw all these psychedelic patterns on it. The purpose of the squigglies and whatnots is to allow the last layer of waterproofed cement to take hold. If it's too smooth, the last layer of cement would just fall off in sheets.


The construction workers have also adopted a couple of stray dogs on the site. Here you go, cute pictures.


Now, on to the main purpose of this post:
Enter the Plinth!
As I said in the last post, the plinth is the bit above ground level that connects the foundation to the walls and columns above it. It also defines where your floor ends.

The first thing you need is steel. Which comes in long textured rods. You then need to cut the rods into various usable lengths.

SPARKS!

The smaller pieces are then bent and worked.

These are then put together into a sort of ribwork. The pieces are not welded together, they are merely tied with some really thin metal string. You don't need to weld them together because the concrete will support it later.


Where there isn't any foundation, you first need to stamp down and compress the earth and apply a thin layer of cement above it.

This would be where you measure and define where your rebar is going to hang and where you are going to build your mould.

The metal rods are then worked into the columns that they are connected to. As opposed to the foundation, the metal ribs are put together on the spot here.

Here, the ribs are being tied to the rods.

The metal rods are also worked into the ribs that were laid down over the foundation. Again, this is to make sure that it sets as one piece of concrete.

Here's a close up of the finished ribs connected to a column.
So that's about it for today. If you have any questions about the construction process. Feel free to comment or drop me a line.
love it! steal those doggies for me.
ReplyDeletechristina